Publish Remote Desktop with Azure AD Application Proxy

Requirements

  • Both the RD Web and RD Gateway endpoints must be located on the same machine, and with a common root
  • You should already have deployed RDS
  • You should have already deployed and enabled Application Proxy agent in your local network.
  • This scenario only works with Internet Explorer on Windows 7 or Windows 10 desktops. I repeat ONLY INTERNET EXPLORER
  • It is recommended to use the same internal and external FQDN. If the internal and external FQDNs are different then you should disable Request Header Translation to avoid the client receiving invalid links.
  • On Internet Explorer, enable the RDS ActiveX add-on.

Publish the RD host endpoint

  1. Publish a new Application Proxy application with the following values:
    • Internal URL: https://remote.contoso.com/, where <remote.contoso.com> is the common root that RD Web and RD Gateway share.
    • External URL: This field is automatically populated based on the name of the application, but you can modify it. Your users will go to this URL when they access RDS.
    • Preauthentication method: Azure Active Directory
    • Translate URL headers: No
  1. Assign users to the published RD application. Make sure they all have access to RDS, too.
  2. Leave the single sign-on method for the application as Azure AD single sign-on disabled. Your users are asked to authenticate once to Azure AD and once to RD Web, but have single sign-on to RD Gateway.
  3. Select Azure Active Directory, and then App Registrations. Choose your app from the list.
  4. Under Manage, select Branding.
  5. Update the Home page URL field to point to your RD Web endpoint (like https://remote.contoso.com/RDWeb).

Direct RDS traffic to Application Proxy

Connect to the RDS deployment as an administrator and change the RD Gateway server name for the deployment. This configuration ensures that connections go through the Azure AD Application Proxy service.

  1. Connect to the RDS server running the RD Connection Broker role.
  2. Launch Server Manager.
  3. Select Remote Desktop Services from the pane on the left.
  4. Select Overview.
  5. In the Deployment Overview section, select the drop-down menu and choose Edit deployment properties.
  6. In the RD Gateway tab, change the Server name field to the External URL that you set for the RD host endpoint in Application Proxy.
  7. Change the Logon method field to Password Authentication.
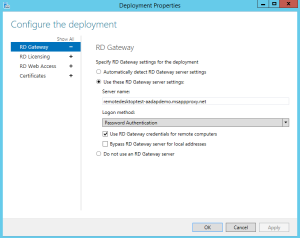
  8. Run this command for each collection:
Set-RDSessionCollectionConfiguration -CollectionName "QuickSessionCollection" -CustomRdpProperty "pre-authentication server address:s:https://remotedesktoptest-aadapdemo.msappproxy.net/`nrequire pre-authentication:i:1"

(Remember to use the ` on the previous command
How to add custom domain names to a Microsoft GCC Cloud tenant

How to add custom domain names to a GCC tenant.

In the GCC cloud, custom domains need to be added using Azure AD PowerShell for Office 365 GCC High tenants.
1. First, ensure you have installed the Azure AD PowerShell module.In the Administrator: Windows PowerShell command window, run this command:
Install-Module -Name AzureAD

2. Use the New-AzureADDomain cmdlet to add the domain to Azure AD.
New-AzureADDomain -name contoso.com

3. Use the Get-AzureADDomainVerificationDnsRecord to retrieve the details necessary to be entered onto the domain’s DNS zone (this is to prove ownership of the domain).
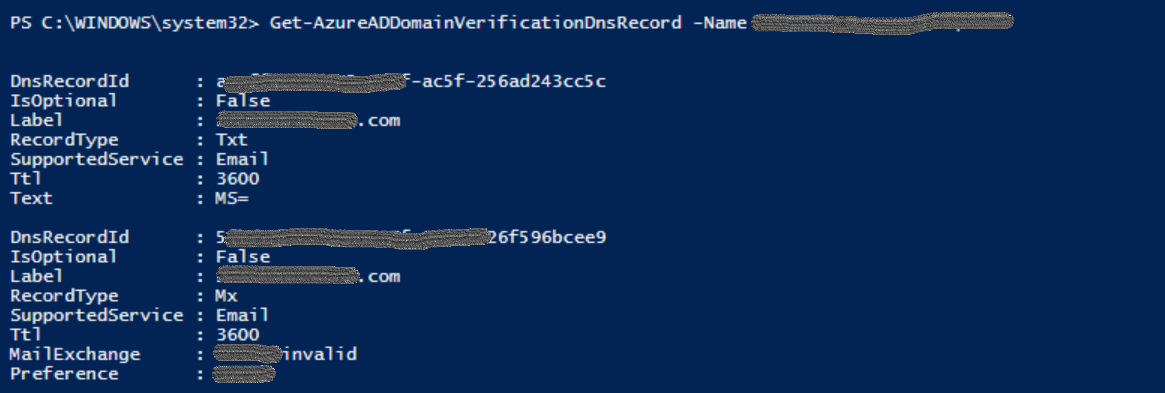
Get-AzureADDomainVerificationDnsRecord -Name contoso.com | fl

The output will look like the following image:

4. Add the TXT record for verification with the customer’s DNS hosting provided.

5. After the verification record has been added to the public DNS servers and successfully propagated across the internet, use the following command to validate ownership
Confirm-AzureADDomain -Name contoso.com

The command will not return successfully until DNS replication is completed. This could take up to 72 hours due to replication. It has no dependency on Microsoft network.

Microsoft Ignite 2019 – Exchange Online Announcements

I had the opportunity to attend the Microsoft Ignite conference In Orlando Florida last week. I had an amazing time connecting with old friends and making new ones too. I enjoyed talking with other attendees, Microsoft staff and MVPs, and vendors about the value and impact of Microsoft365, Azure and other Microsoft’s services in our daily life.

Coming from an Exchange/Messaging background, it was a little difficult to realize that the Microsoft Exchange product has reached its maturity level and the focus has been diverted into other directions, especially Azure and Security. However, the Microsoft Exchange Team managed to put several amazing breakout sessions with very important announcement that will bring benefits to the end-users and administrators.

Exchange Online Email Enhancements for End Users

  • Support for Plus Addressing

Now you can have addresses such as carlos+otherusers@m365talks.com

  • Send from proxy address (alias)

The ability to send from an SMTP proxy address (alias) and having the that address be preserved in the recipient’s FROM and REPLY TO is one of those enhancements. (Pretty cool feature)

  • Message Recall in Exchange Online

This one is the best feature released. The current Message Recall feature is client-based, and only Outlook for Windows supports it today. The sender needs to use Outlook to recall a message, and the recipient needs to use Outlook for the recall to work. But thanks to M365 that host millions of Mailboxes, Microsoft is now able to implement a cloud-based message recall in the Office 365 datacenters that will recall the message directly from Office 365 mailboxes. It won’t matter which email client the recipient uses to sync with their Office 365 mailbox.

  • Reply-All Storm Protection

For an organization in Office 365, Microsoft will identify what looks like might be a Reply-All storm conversation. Then a temporarily block will be enabled on anyone from replying to all members of the conversation, sending a bounce message (NDR) back to anyone who tries. So, when Exchange Online detects what looks like it might be a Reply-All storm, anyone who subsequently attempts to reply to everyone will get an NDR back instead.


Some of the announcement about email enhancements for Admins

  • Modern Exchange Admin Center (EAC) Portal

Updated to look like all other Office365 admin portals

  • Customizable Recipient Limits

The setting can be found in EAC > Recipients > Mailboxes > Mailbox Features > Mail Flow, and once made available in the first part of 2020, admins will be able to customize the Recipient Limit from 1 to 1000 for individual mailboxes.

Example: Set-Mailbox clopez@m365talks.com -RecipientLimits 20
  • Securing SMTP Auth Submissions

Organizations required to use MFA, Conditional Access, Sign-in risk policies, and modern authentication have challenges with compliance especially with printers, scanners, or SMTP relays that does not support modern authentication. To help reduce the potential for exploiting the less secure SMTP authenticated submission protocol, last year the Exchange Team introduced the ability to disable SMTP authenticated submission for both your organization and for individual mailboxes via Remote PowerShell cmdlets.