Best Practices to Manage Inactive Teams or Office 365 Groups

As a best practice to deploy Teams, I recommend all my clients to configure an expiration policy for inactive Teams or Office 365 Groups. With the increase in usage of Office 365 Groups, we will need to find a way to clean up unused groups. Expiration policies can help us remove inactive groups from the system and make things cleaner.

We can specify an expiration period on any inactive group that reaches the end of that period, and if not renewed, it will be deleted. The expiration period begins when the group is created, or on the date it was last renewed. Group owners will automatically be sent an email before the expiration that allows them to renew the group for another expiration interval. Groups that are actively in use are renewed automatically an no interaction from the owner is required. Any of the following actions will auto-renew a group:

  • Using SharePoint – view, edit, download, move, share, or upload files.
  • Using Outlook – join group, read or write group message from the group, and like a message (Outlook on the web).
  • Using Teams – visiting a team’s channel.

I recommend starting with 6 months (180 days) policy and adapt based on end-user feedback. Keep in mind that activating the policy will trigger a renewal message to all owner of inactive group.

If you have setup retention policy in Security and Compliance center for groups, expiration policy works seamlessly with retention policy. When a group expires, the group’s conversations in mailbox and files in the group site are retained in the retention container for the specific number of days defined in the retention policy.

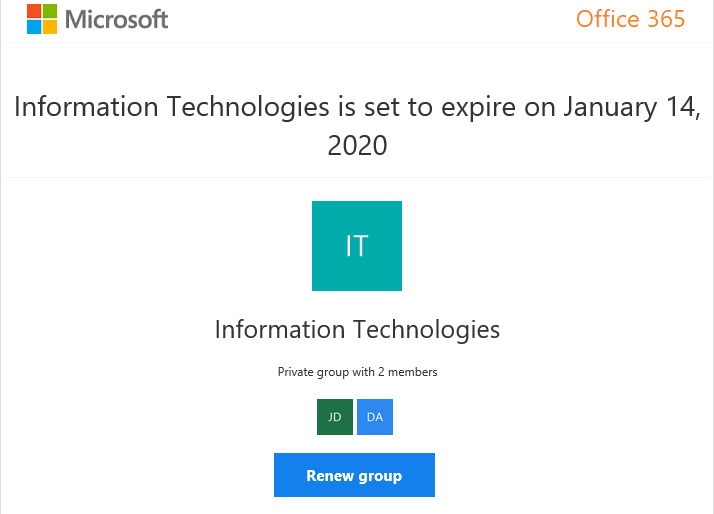
After activation of the policy, owners will receive the following message

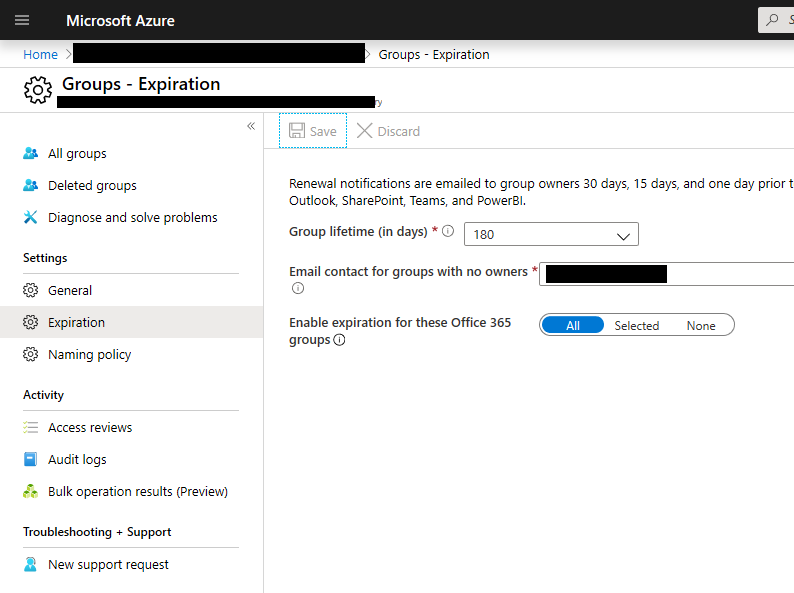
To enable the policy

  1. Open the Azure AD admin center with an account that is a global administrator in your Azure AD organization.
  2. Select Groups, then select Expiration to open the expiration settings.
  3. On the Expiration page, you can:
    1. Set the group lifetime in days. You could select one of the preset values, or a custom value (should be 31 days or more).
    2. Specify an email address where the renewal and expiration notifications should be sent when a group has no owner.
    3. Select which Office 365 groups expire. You can set expiration for:
      1. All Office 365 groups
      2. A list of Selected Office 365 groups
      3. None to restrict expiration for all groups
    4. Save your settings when you’re done by selecting Save

With Microsoft, security can be simple once again

With Microsoft, security can be simple once again. Microsoft 365 provides an intelligent security hub that works seamlessly across platforms, going far beyond Microsoft to Linux, Mac and others — so you can manage mission-critical workloads with existing tools at your fingertips. Contact us to learn how Microsoft 365 helps keep your organization secure and productive.

Publish Remote Desktop with Azure AD Application Proxy

Requirements

  • Both the RD Web and RD Gateway endpoints must be located on the same machine, and with a common root
  • You should already have deployed RDS
  • You should have already deployed and enabled Application Proxy agent in your local network.
  • This scenario only works with Internet Explorer on Windows 7 or Windows 10 desktops. I repeat ONLY INTERNET EXPLORER
  • It is recommended to use the same internal and external FQDN. If the internal and external FQDNs are different then you should disable Request Header Translation to avoid the client receiving invalid links.
  • On Internet Explorer, enable the RDS ActiveX add-on.

Publish the RD host endpoint

  1. Publish a new Application Proxy application with the following values:
    • Internal URL: https://remote.contoso.com/, where <remote.contoso.com> is the common root that RD Web and RD Gateway share.
    • External URL: This field is automatically populated based on the name of the application, but you can modify it. Your users will go to this URL when they access RDS.
    • Preauthentication method: Azure Active Directory
    • Translate URL headers: No
  1. Assign users to the published RD application. Make sure they all have access to RDS, too.
  2. Leave the single sign-on method for the application as Azure AD single sign-on disabled. Your users are asked to authenticate once to Azure AD and once to RD Web, but have single sign-on to RD Gateway.
  3. Select Azure Active Directory, and then App Registrations. Choose your app from the list.
  4. Under Manage, select Branding.
  5. Update the Home page URL field to point to your RD Web endpoint (like https://remote.contoso.com/RDWeb).

Direct RDS traffic to Application Proxy

Connect to the RDS deployment as an administrator and change the RD Gateway server name for the deployment. This configuration ensures that connections go through the Azure AD Application Proxy service.

  1. Connect to the RDS server running the RD Connection Broker role.
  2. Launch Server Manager.
  3. Select Remote Desktop Services from the pane on the left.
  4. Select Overview.
  5. In the Deployment Overview section, select the drop-down menu and choose Edit deployment properties.
  6. In the RD Gateway tab, change the Server name field to the External URL that you set for the RD host endpoint in Application Proxy.
  7. Change the Logon method field to Password Authentication.
  8. Run this command for each collection:
Set-RDSessionCollectionConfiguration -CollectionName "QuickSessionCollection" -CustomRdpProperty "pre-authentication server address:s:https://remotedesktoptest-aadapdemo.msappproxy.net/`nrequire pre-authentication:i:1"

(Remember to use the ` on the previous command