Requirements
- Both the RD Web and RD Gateway endpoints must be located on the same machine, and with a common root
- You should already have deployed RDS
- You should have already deployed and enabled Application Proxy agent in your local network.
- This scenario only works with Internet Explorer on Windows 7 or Windows 10 desktops. I repeat ONLY INTERNET EXPLORER
- It is recommended to use the same internal and external FQDN. If the internal and external FQDNs are different then you should disable Request Header Translation to avoid the client receiving invalid links.
- On Internet Explorer, enable the RDS ActiveX add-on.
Publish the RD host endpoint
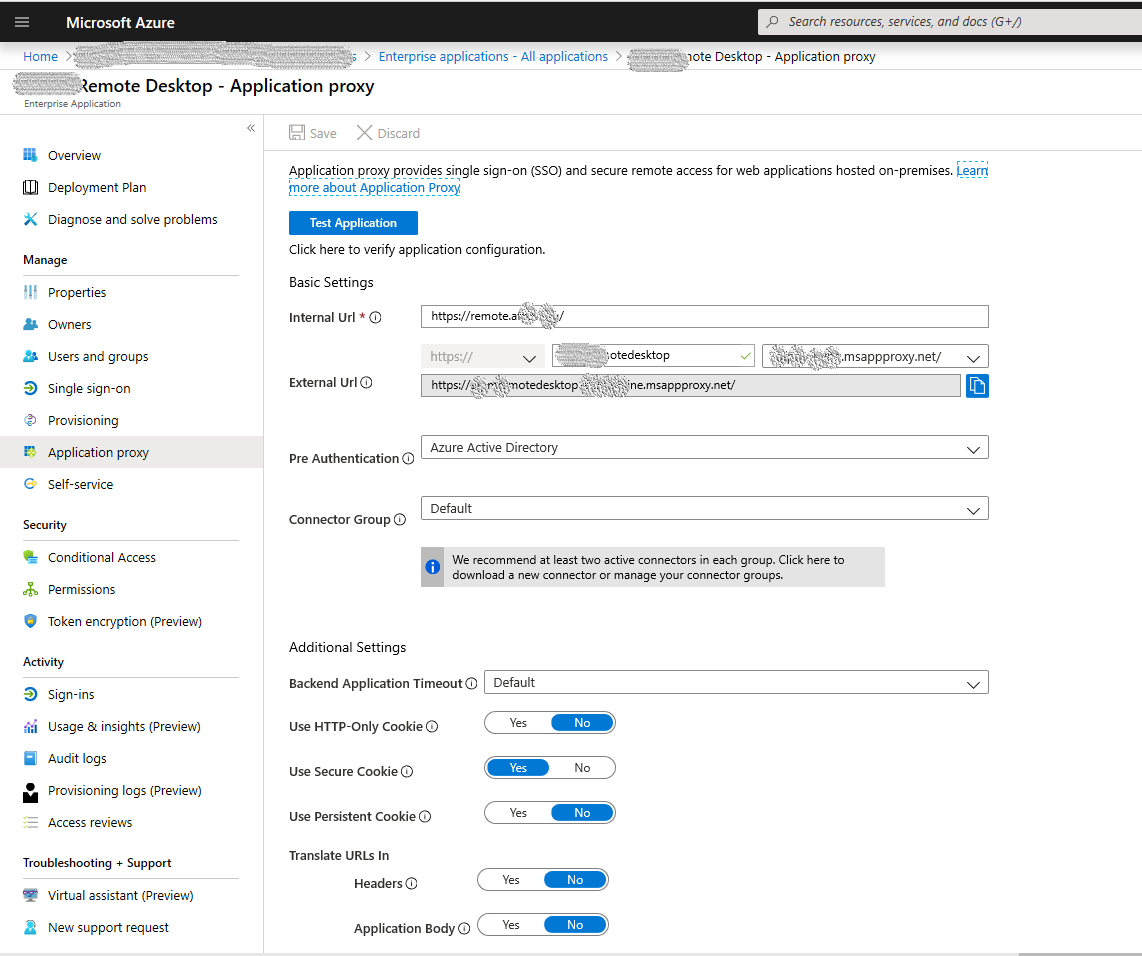
- Publish a new Application Proxy application with the following values:
-
- Internal URL: https://remote.contoso.com/, where <remote.contoso.com> is the common root that RD Web and RD Gateway share.
- External URL: This field is automatically populated based on the name of the application, but you can modify it. Your users will go to this URL when they access RDS.
- Preauthentication method: Azure Active Directory
- Translate URL headers: No
- Assign users to the published RD application. Make sure they all have access to RDS, too.
- Leave the single sign-on method for the application as Azure AD single sign-on disabled. Your users are asked to authenticate once to Azure AD and once to RD Web, but have single sign-on to RD Gateway.

- Select Azure Active Directory, and then App Registrations. Choose your app from the list.
- Under Manage, select Branding.
- Update the Home page URL field to point to your RD Web endpoint (like https://remote.contoso.com/RDWeb).

Direct RDS traffic to Application Proxy
Connect to the RDS deployment as an administrator and change the RD Gateway server name for the deployment. This configuration ensures that connections go through the Azure AD Application Proxy service.
- Connect to the RDS server running the RD Connection Broker role.
- Launch Server Manager.
- Select Remote Desktop Services from the pane on the left.
- Select Overview.
- In the Deployment Overview section, select the drop-down menu and choose Edit deployment properties.
- In the RD Gateway tab, change the Server name field to the External URL that you set for the RD host endpoint in Application Proxy.
- Change the Logon method field to Password Authentication.

- Run this command for each collection:

Set-RDSessionCollectionConfiguration -CollectionName "QuickSessionCollection" -CustomRdpProperty "pre-authentication server address:s:https://remotedesktoptest-aadapdemo.msappproxy.net/`nrequire pre-authentication:i:1"
(Remember to use the ` on the previous command

I just cant get the RDP file to work with the app proxy. i keep getting “login failed”
LikeLiked by 1 person
Hello Jack,
I have seen this when we are using Edge or a newer browsers and not the old Internet Explorer with ActiveX enabled. However, new updates have been released in the last month about integration RDS web client.
https://techcommunity.microsoft.com/t5/azure-active-directory-identity/azure-ad-application-proxy-now-supports-the-remote-desktop/ba-p/1257367
Hope this helps
LikeLike